The beauty of natural wood is timeless. Its unique grain patterns, rich colors, and warm textures bring an unparalleled sense of elegance and sophistication to any interior space. However, using solid wood for large surfaces like cabinetry, wardrobes, and wall panels can be prohibitively expensive and environmentally taxing.
This is where the art of wood veneering provides a brilliant solution, offering the aesthetic appeal of exotic and fine woods in a sustainable and versatile format. Mastering wood veneer lamination techniques is essential for creating high-end, bespoke furniture and interiors that stand the test of time.
At MRETTY, we specialize in crafting exquisite custom cabinetry, and the precise application of wood veneer is fundamental to our work. This guide will walk you through the world of wood veneer, from understanding its properties to mastering the lamination processes that ensure a flawless, professional finish. Whether you are a woodworking enthusiast or a homeowner interested in the craftsmanship behind your custom furniture, this detailed exploration will provide valuable insights.
Understanding Wood Veneer & Its Applications
Wood veneer is a thin slice of real wood, typically less than 3 mm thick, that is carefully cut from a log. This process allows a single log to produce a large surface area of decorative wood, making it an efficient use of a precious natural resource. Unlike solid wood, which can be prone to warping and splitting with changes in humidity and temperature, veneer is applied to a stable substrate material, such as plywood or MDF (Medium-Density Fiberboard). This combination results in a finished product that is both beautiful and structurally sound.
Applications in Bespoke Interiors
The versatility of wood veneer makes it a preferred choice for a wide range of custom interior applications. At MRETTY, we utilize its unique properties to create:
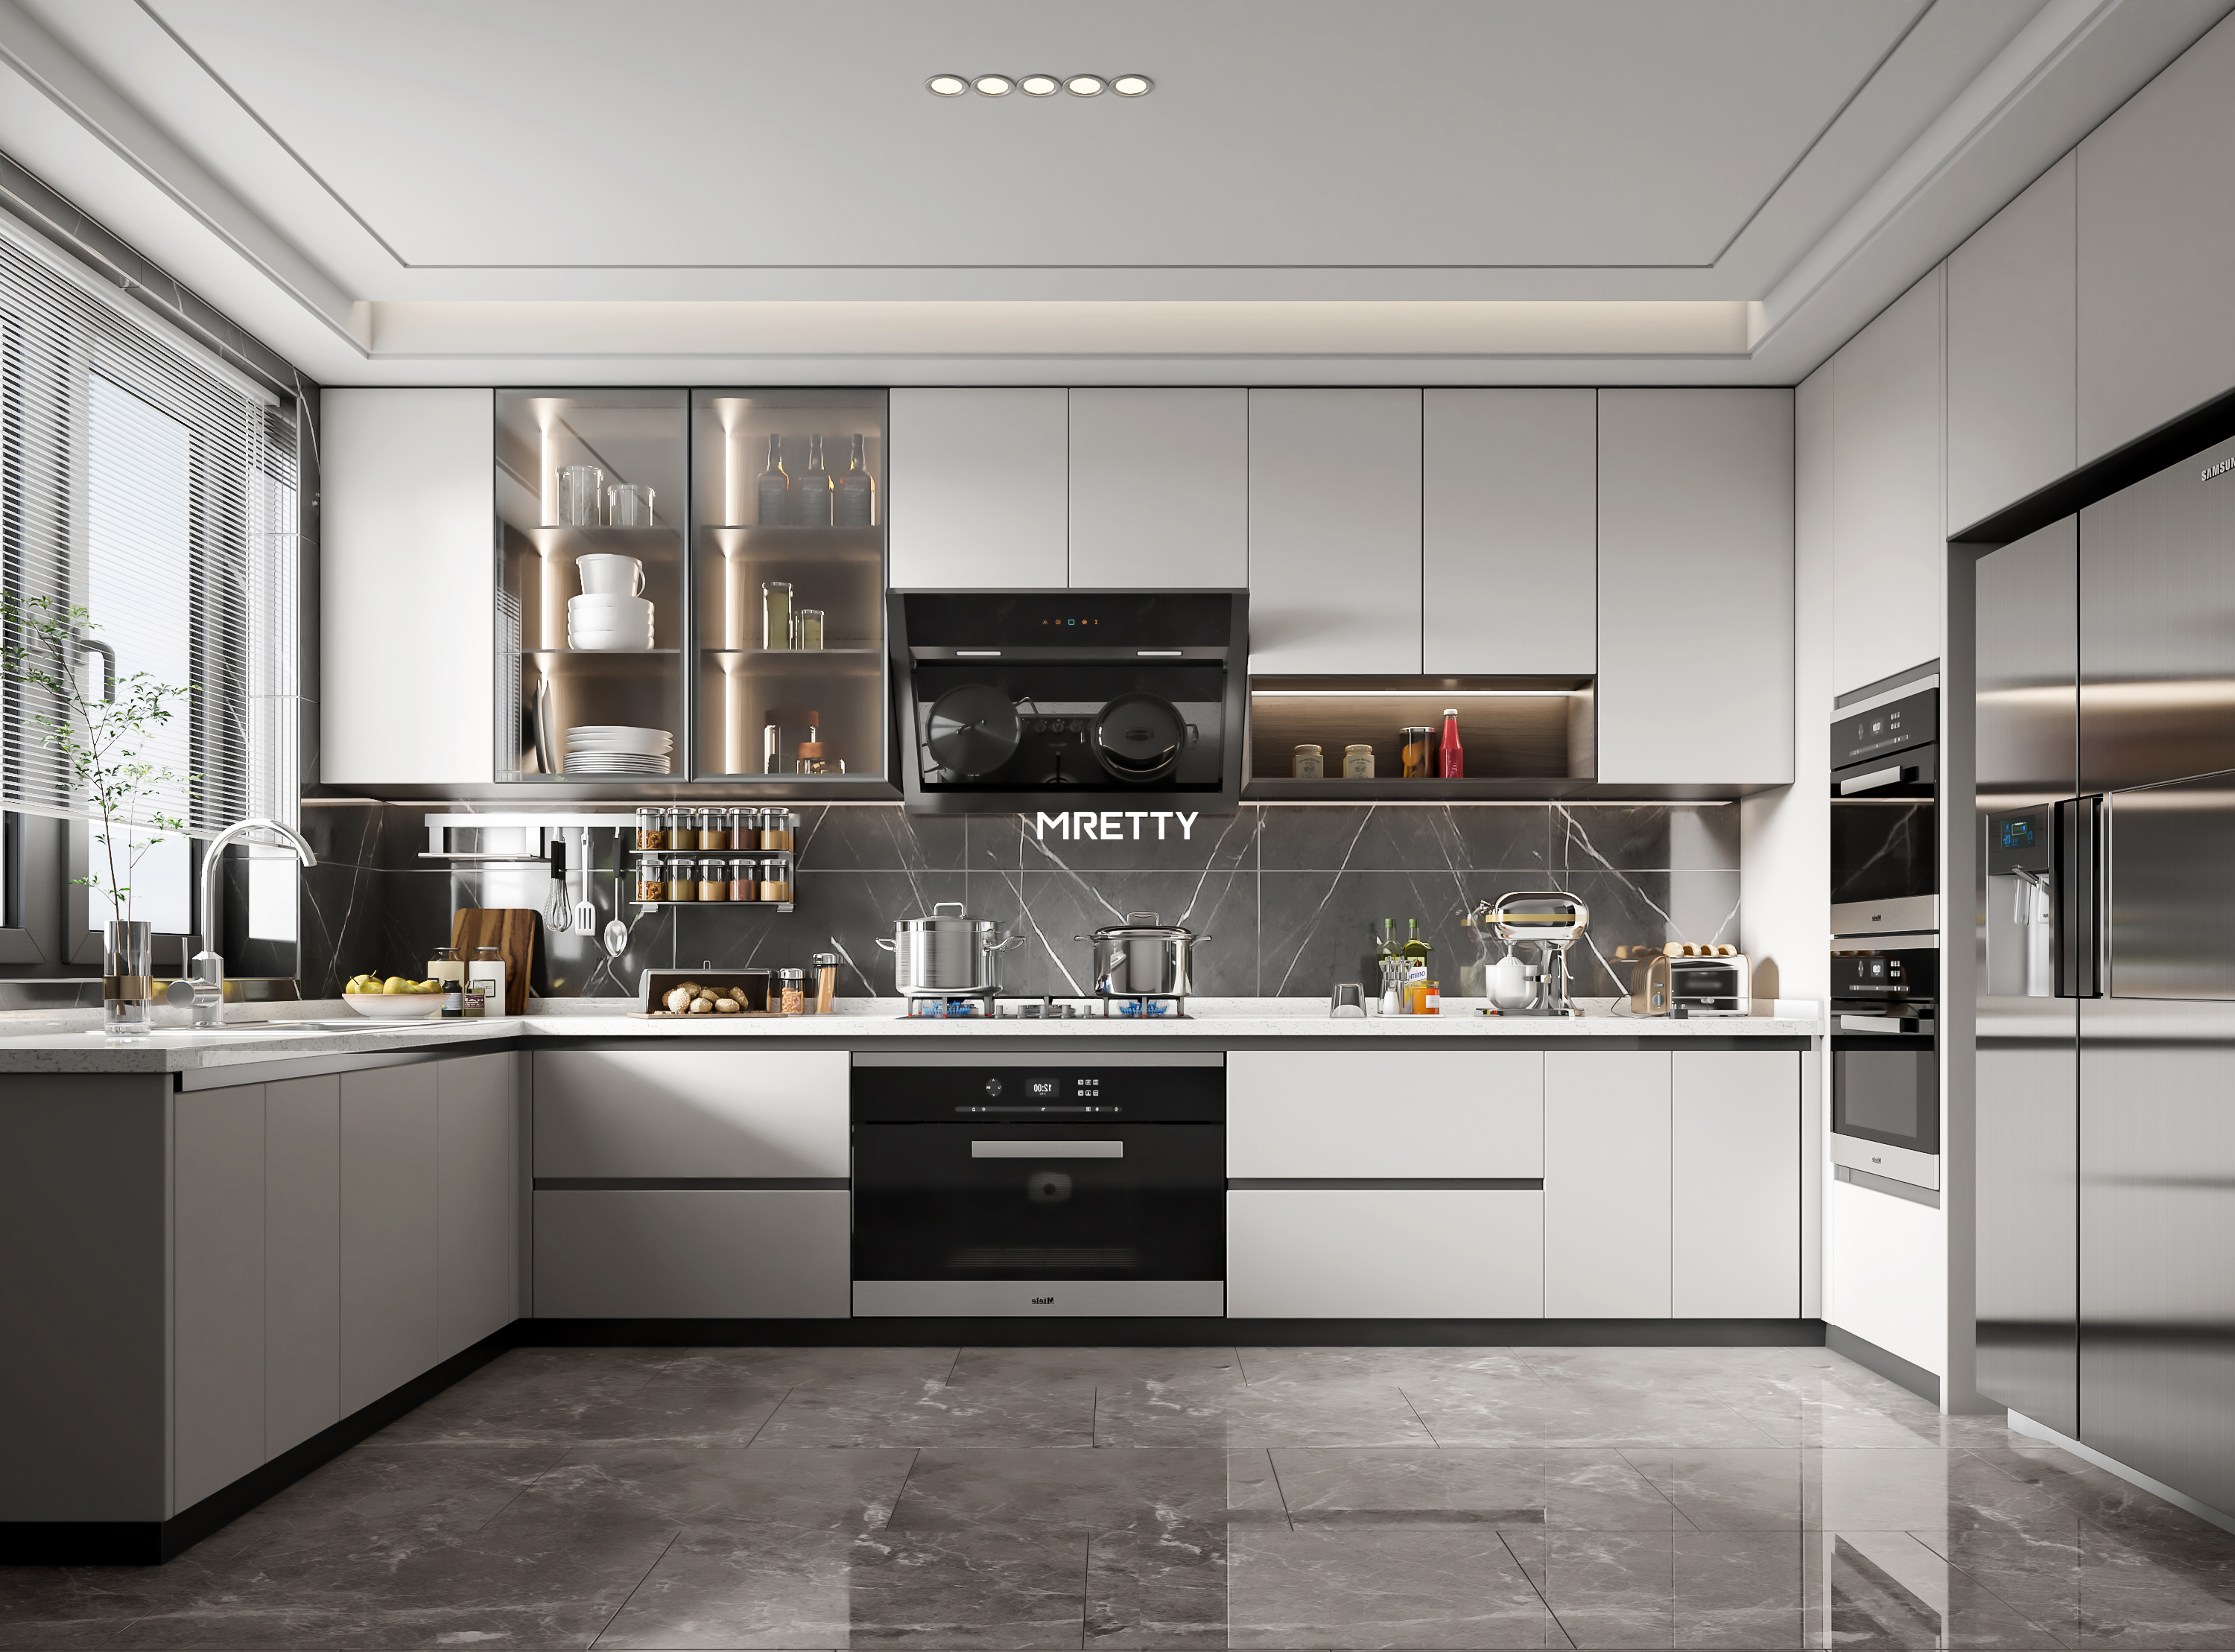
Kitchen Cabinets and Islands: Veneer allows for stunning, book-matched grain patterns across a series of cabinet doors, creating a seamless and luxurious look that is difficult to achieve with solid wood.
Wardrobes and Walk-in Closets: Large wardrobe doors and closet systems become canvases for beautiful wood grains, turning a functional storage area into a design statement.
Bathroom Vanities: When properly sealed, wood veneer brings a warm, organic element to bathroom design, contrasting beautifully with tile and stone.
Bookcases and Study Furniture: Custom-built shelving and desks finished with wood veneer exude an air of classic elegance and intellectual charm.
Wall Paneling and Feature Walls: Veneer is an an excellent material for creating accent walls, adding texture, warmth, and a focal point to any room.
Interior Doors: A veneered door can introduce the beauty of a specific wood species throughout a home, tying different spaces together.
Overview of Wood Veneer Lamination Techniques
Lamination is the process of bonding the thin wood veneer sheet to a stable substrate. The goal is to create a permanent, bubble-free bond that makes the veneer and substrate appear as a single, solid piece of wood. The chosen technique often depends on the scale of the project, the type of veneer, and the equipment available.
The primary methods used in professional woodworking include:
Cold Press Lamination: This technique uses a strong adhesive and even pressure, applied without heat. It is a common method for both small-scale projects and industrial applications.
Hot Press Lamination: In this industrial method, heat is used to activate a thermosetting adhesive while the veneer and substrate are under immense pressure. This creates an incredibly strong and durable bond quickly.
Vacuum Press Lamination: A vacuum press uses atmospheric pressure to clamp the veneer onto the substrate. It is exceptionally effective for curved or irregularly shaped surfaces, as the flexible vacuum bag conforms to any shape.
Choosing the right method is crucial. For the high-end, custom cabinetry that MRETTY is known for, we often rely on precision-controlled press methods to ensure a perfect, durable bond that lasts for decades.
Step-by-Step Guide to Applying Wood Veneer
Here, we explore the practical steps for applying wood veneer using different methods. Regardless of the technique, proper preparation is the key to success.
Preparation: Foundation for a Flawless Finish
Select Your Materials: Choose a high-quality veneer and a stable, flat substrate like MDF or cabinet-grade plywood. Ensure the substrate is clean, dry, and free of any dust, oil, or imperfections.
Acclimate Your Materials: Allow both the veneer and the substrate to acclimate to the workshop's environment for at least 48 hours. This prevents expansion or contraction after lamination, which could cause cracks or bubbles.
Prepare the Veneer: Inspect the veneer for any defects. If you are joining multiple pieces to create a larger surface (e.g., for book-matching), trim the edges perfectly straight with a sharp veneer saw or utility knife and straightedge. Use veneer tape to hold the seams together on the presentation face.
Prepare the Substrate: Sand the substrate with medium-grit sandpaper (around 150-grit) to create a smooth, flat surface for the adhesive to bond to. Clean off all dust thoroughly.
Cold Press Lamination with Contact Cement (DIY & Small Projects)
Contact cement offers a strong bond without the need for extensive clamping or specialized equipment, making it popular for smaller projects.
- Apply the Adhesive: Using a roller or brush, apply a thin, even coat of contact cement to the back of the veneer and the face of the substrate. Be sure to cover the entire surface, edge to edge.
- Allow the Adhesive to Dry: Let the contact cement dry to the touch, which typically takes 15-30 minutes. It should feel tacky but not transfer to your finger. This step is critical; wet cement will not form a proper bond.
- Position the Veneer: This is the most crucial step, as contact cement bonds instantly and permanently on contact. Place small wooden dowels or slip sheets on top of the substrate. Carefully lay the veneer on top of the dowels, allowing you to position it perfectly without it touching the substrate.
- Bond the Veneer: Starting from the center, remove the middle dowel and press the veneer down. Work your way outwards, removing the remaining dowels and smoothing the veneer down firmly.
- Apply Pressure: Use a J-roller or a smooth block of wood to apply firm, even pressure across the entire surface. Start from the center and work towards the edges to push out any trapped air bubbles. Pay special attention to the edges and seams.
- Trim the Excess: Once bonded, place the panel face down on a clean surface and use a sharp utility knife or a flush-trim router bit to trim the overhanging veneer flush with the substrate edges.
Hot Press Lamination: The Professional Standard
This is the preferred method for high-volume, professional shops like MRETTY, as it produces an exceptionally strong and stable bond.
- Apply the Adhesive: A specialized thermosetting adhesive, such as a Urea-Formaldehyde (UF) glue, is applied evenly to the substrate using a glue spreader.
- Assemble the Panel: The veneer is placed onto the adhesive-coated substrate. For balanced panels, a backer veneer is often applied to the reverse side to prevent warping.
- Load the Press: The assembled panel is carefully placed into the hot press. The press consists of heated platens that apply both heat and hydraulic pressure.
- Curing: The press is closed, and the panel is subjected to high pressure (typically 100-200 PSI) and temperature (around 120-150°C). The heat activates the glue, and the pressure ensures a tight, void-free bond. The curing time is short, usually just a few minutes.
- Cooling and Trimming: After the cycle is complete, the panel is removed from the press and allowed to cool. Once cooled, the edges are trimmed for a clean, finished panel ready for assembly.
Vacuum Press Lamination: For Curves & Complex Shapes
A vacuum press is invaluable for veneering curved surfaces, such as arched cabinet doors or custom-shaped furniture components.
- Prepare the Mold and Substrate: For curved work, you will need a mold or form that matches the desired shape. The substrate is bent and clamped to this form.
- Apply the Adhesive: Apply a cold-press veneer glue (like a PVA or epoxy) to the substrate. Cold-press glues have a longer open time, which is necessary for the vacuum bagging process.
- Position the Veneer: Carefully lay the veneer over the glued substrate, smoothing it by hand.
- Bag the Project: Place the entire assembly (mold, substrate, and veneer) into a large vinyl or polyurethane vacuum bag. A breather mesh may be placed over the veneer to ensure air can be evacuated evenly.
- Apply Vacuum: Seal the bag and connect it to a vacuum pump. As the pump removes air from the bag, the outside atmospheric pressure (about 14.7 PSI at sea level) pushes the bag down, clamping the veneer tightly against the substrate with perfectly uniform pressure.
- Curing: Allow the glue to cure completely according to the manufacturer's instructions, which can take several hours. The vacuum must be maintained throughout this period.
- Unbag and Trim: Once cured, release the vacuum, remove the project from the bag, and trim the excess veneer.
Tips for Achieving a Professional Veneer Finish
The difference between an amateur and a professional veneering job lies in the details.
Use a Backer Veneer: To create a balanced panel that resists warping, always apply a backer or balance veneer to the opposite side of the substrate. This should be a veneer of similar thickness and properties to the face veneer.
Pay Attention to Grain Direction: Consider how the grain direction will look on the final piece. For book-matched panels, ensure the seams are tight and the pattern is aligned perfectly.
Sanding is Key: After trimming, gently sand the veneered surface and edges. Start with a fine-grit sandpaper (220-grit) and be extremely careful not to sand through the thin veneer, especially at the edges. Always sand with the direction of the grain.
Remove Veneer Tape Carefully: After lamination, lightly moisten the paper veneer tape with a damp sponge to soften the adhesive, then gently scrape it off with a cabinet scraper or plastic putty knife.
Choose the Right Finish: The final finish protects the veneer and enhances its beauty. Polyurethane, lacquer, and conversion varnish are excellent choices for cabinetry as they provide high durability and moisture resistance. Apply multiple thin coats, sanding lightly between coats for a silky-smooth result.
Common Challenges & Veneer Troubleshooting
Even with careful preparation, issues can arise. Here’s how to handle them:
Bubbles or Blisters
These are often caused by trapped air, uneven glue application, or insufficient pressure.
Troubleshooting: For a small bubble, you can sometimes slice it open with a razor blade along the grain, carefully inject a small amount of glue with a syringe, and then press it flat with a heated iron (over a piece of parchment paper) or clamp it down until dry.
Cracking or Splitting
This can happen if the veneer dries out too quickly or if the panel is not properly balanced.
Troubleshooting: Use a veneer softener before application if the veneer is brittle. Always use a backer veneer to ensure panel stability. Minor cracks can sometimes be filled with matching wood putty before finishing.
Glue Bleed-Through
This occurs when too much glue is applied and it soaks through the porous veneer.
Troubleshooting: Apply a thin, consistent coat of adhesive. For very porous veneers, a glue sizing wash (a diluted coat of glue that is allowed to dry) can be applied first to seal the wood pores.
Conclusion: Mastering Wood Veneering for Quality Craftsmanship
Wood veneer lamination is more than just a woodworking technique; it is an art form that blends natural beauty with precision engineering. Mastering these methods allows for the creation of stunning, durable, and sustainable custom furniture and interiors that would be impossible or impractical to produce from solid wood alone.
At MRETTY, our commitment to excellence is reflected in every detail of our work. We leverage advanced lamination techniques and the finest materials to build bespoke kitchen cabinets, wardrobes, and other interior systems that are both functionally superior and aesthetically breathtaking. Our adherence to FSC (Forest Stewardship Council) certification standards ensures that our materials are sourced responsibly, aligning our craft with environmental stewardship.
By understanding the principles of wood veneer lamination, you gain a deeper appreciation for the skill and craftsmanship that go into high-quality custom cabinetry.
Ready to transform your home with the timeless beauty of expertly crafted wood veneer?
Book a Free Consultation Now to discuss your project with one of our design experts.
Meet the Expert: Yang Song
Written by: Yang Song
Award-winning designer and lead craftsman at MRETTY, renowned for his innovative work on the "Orchard Residence" project, which won the Singapore Interior Design Award for "Best Kitchen Design" in 2023.
Related Products & Inspirations
Whole-House Customization
The line is always simple, the structure is always unexpected.
Explore our gallery of integrated home solutions, from living room built-ins to complete study systems, all tailored to your unique style.
Bespoke Kitchen Systems
Ingenious conception in mind, a good life in the kitchen.
Discover how our custom kitchen cabinets and islands can merge functionality and elegance to become the true heart of your home.
Customer FAQs
Is Wood Veneer as Durable as Solid Wood?
A: When applied to a stable substrate, wood veneer is often more durable than solid wood in terms of stability. It is far less likely to warp, crack, or split due to changes in humidity. The surface durability depends on the protective finish applied. MRETTY uses high-performance finishes to ensure our cabinetry withstands daily use.
MRETTY vs. Competitor X: Quality & Craftsmanship
A: While many brands offer custom furniture, MRETTY distinguishes itself through its uncompromising commitment to material quality and craftsmanship. Unlike Competitor X, which may use lower-grade substrates, we insist on premium, high-density materials and advanced lamination techniques. Our focus on bespoke design means every project is uniquely tailored to the client's lifestyle, not adapted from a standard template. This results in a truly personalized and superior-quality product.
Maintenance for Veneered Furniture
A: Maintenance is simple. Dust regularly with a soft, dry cloth. For cleaning, use a slightly damp cloth and wipe in the direction of the wood grain, then dry immediately. Avoid using harsh chemical cleaners or abrasive sponges that could damage the finish.
MRETTY: Premium Bespoke Kitchen & Cabinet Systems Provider in Singapore.